Animation Export
The Character Animation tab turns a rigged, animated prefab into 2D output — a folder of PNG frames, a packed sprite sheet, or a single captured pose. You pick a clip, scrub to the part you want, and export. Everything on this tab reads the same live preview you already know from Capturing a Single Sprite, so what you see is what you get.
Prerequisites
A prefab with an Animator (or legacy Animation) component and at least one clip, loaded into the preview. If you haven't loaded a prefab yet, do the First Sprite loop once first — load, frame, export — then come back here to animate it.
1. Open the Character Animation tab
Open Snap Studio Pro (Tools → Rev Gaming → Snap Studio Pro) and switch to the Character Animation tab. If the prefab has no animation components, or no clips can be found on it, the tab tells you so and the controls stay disabled — that's the guard, not a bug.
2. Pick a clip and a pose
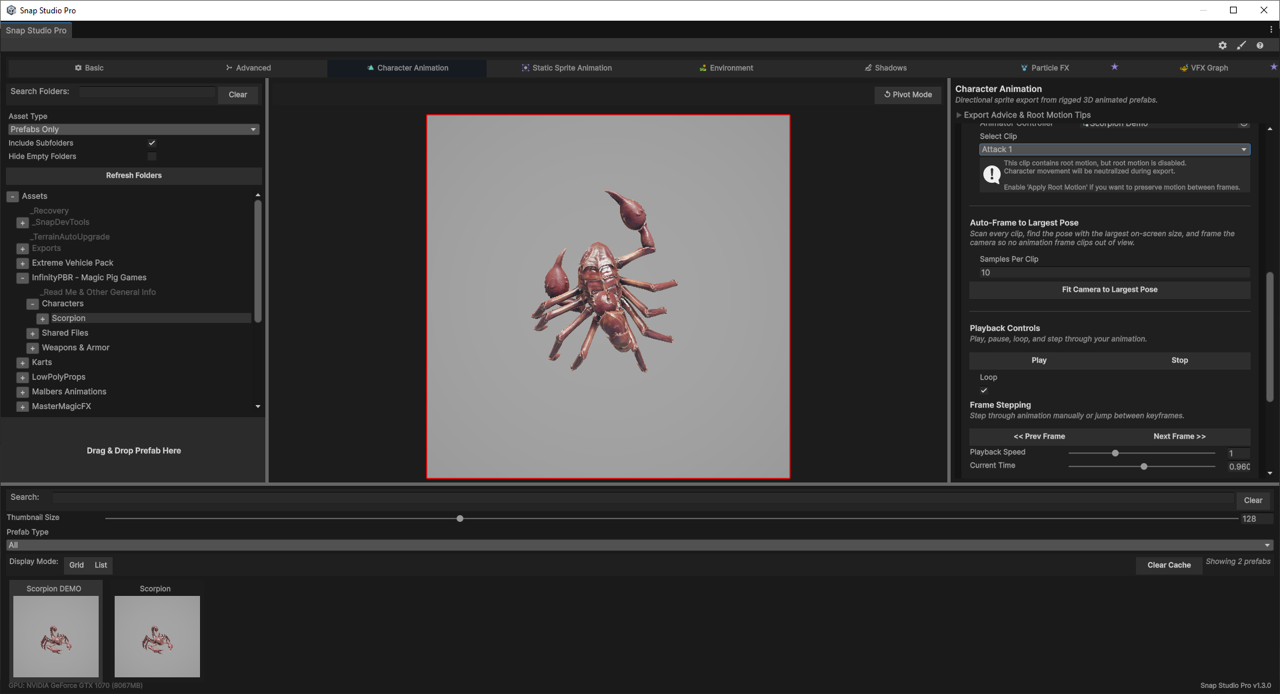
Open the Animation Preview foldout. Under Animation Controls:
- Select Clip — choose which clip to preview and export. Snap lists every clip it discovers on the prefab's Animator (or its assigned Animator Controller, which you can swap in the object field above the popup).
- Play / Pause / Stop, Loop, and << Prev Frame / Next Frame >> step through the animation in the preview.
- Playback Speed and Current Time let you scrub to an exact moment. The Current Time slider is the frame that a single-frame capture will grab.
Root motion is neutralised unless you ask for it
Under Playback Options, Apply Root Motion preserves a clip's forward travel during preview and export. Leave it off and the character animates in place — which is usually what you want for a sprite. If the selected clip contains root motion but the toggle is off, Snap shows an inline reminder so the behaviour is never a surprise.
Frame to the widest pose first
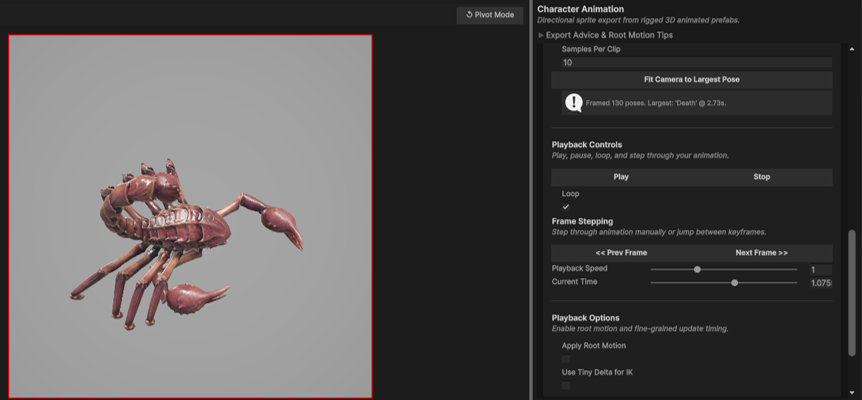
An animated character can be much larger mid-swing than at rest. Use Auto-Frame to Largest Pose (also in the Animation Preview foldout): it scans every clip, finds the frame with the biggest on-screen footprint, and fits the camera so no frame clips out of view. Set Samples Per Clip higher for a finer scan. Do this before exporting so every frame shares the same framing.
3. Capture a single frame (optional)
Sometimes you only want one pose — a mid-jump silhouette, a specific attack frame. Open the Single-Clip Export foldout and use Single Frame Export:
- Scrub Current Time to the pose you want (step 2).
- Set Size Multiplier — output is
512 × 512at1.0x, and the Final Export Size line shows the exact pixels you'll get. - Optionally tick Use Custom Export Folder to choose where it lands.
- Click Export Single Frame.
The frame is written as a transparent PNG named Frame_<milliseconds> (the timestamp of the pose you captured) and imported straight away.
4. Export the whole clip
Still in Single-Clip Export, the Export Selected Clip section captures every frame of the selected clip. Two buttons drive it:
| Button | What it does |
|---|---|
| Export Full Clip | Captures every frame of the selected clip from the current facing. |
| Export All Angles | Captures the full clip once per direction, using the preset from the Directional Capture Settings (see Directional Capture). |
A progress bar runs while it works, and a Stop Export button appears if you need to cancel mid-run.
5. Choose your output shape
Raw frames are always the foundation — the sheet and GIF are built from them. The options above the export buttons decide what you end up with.
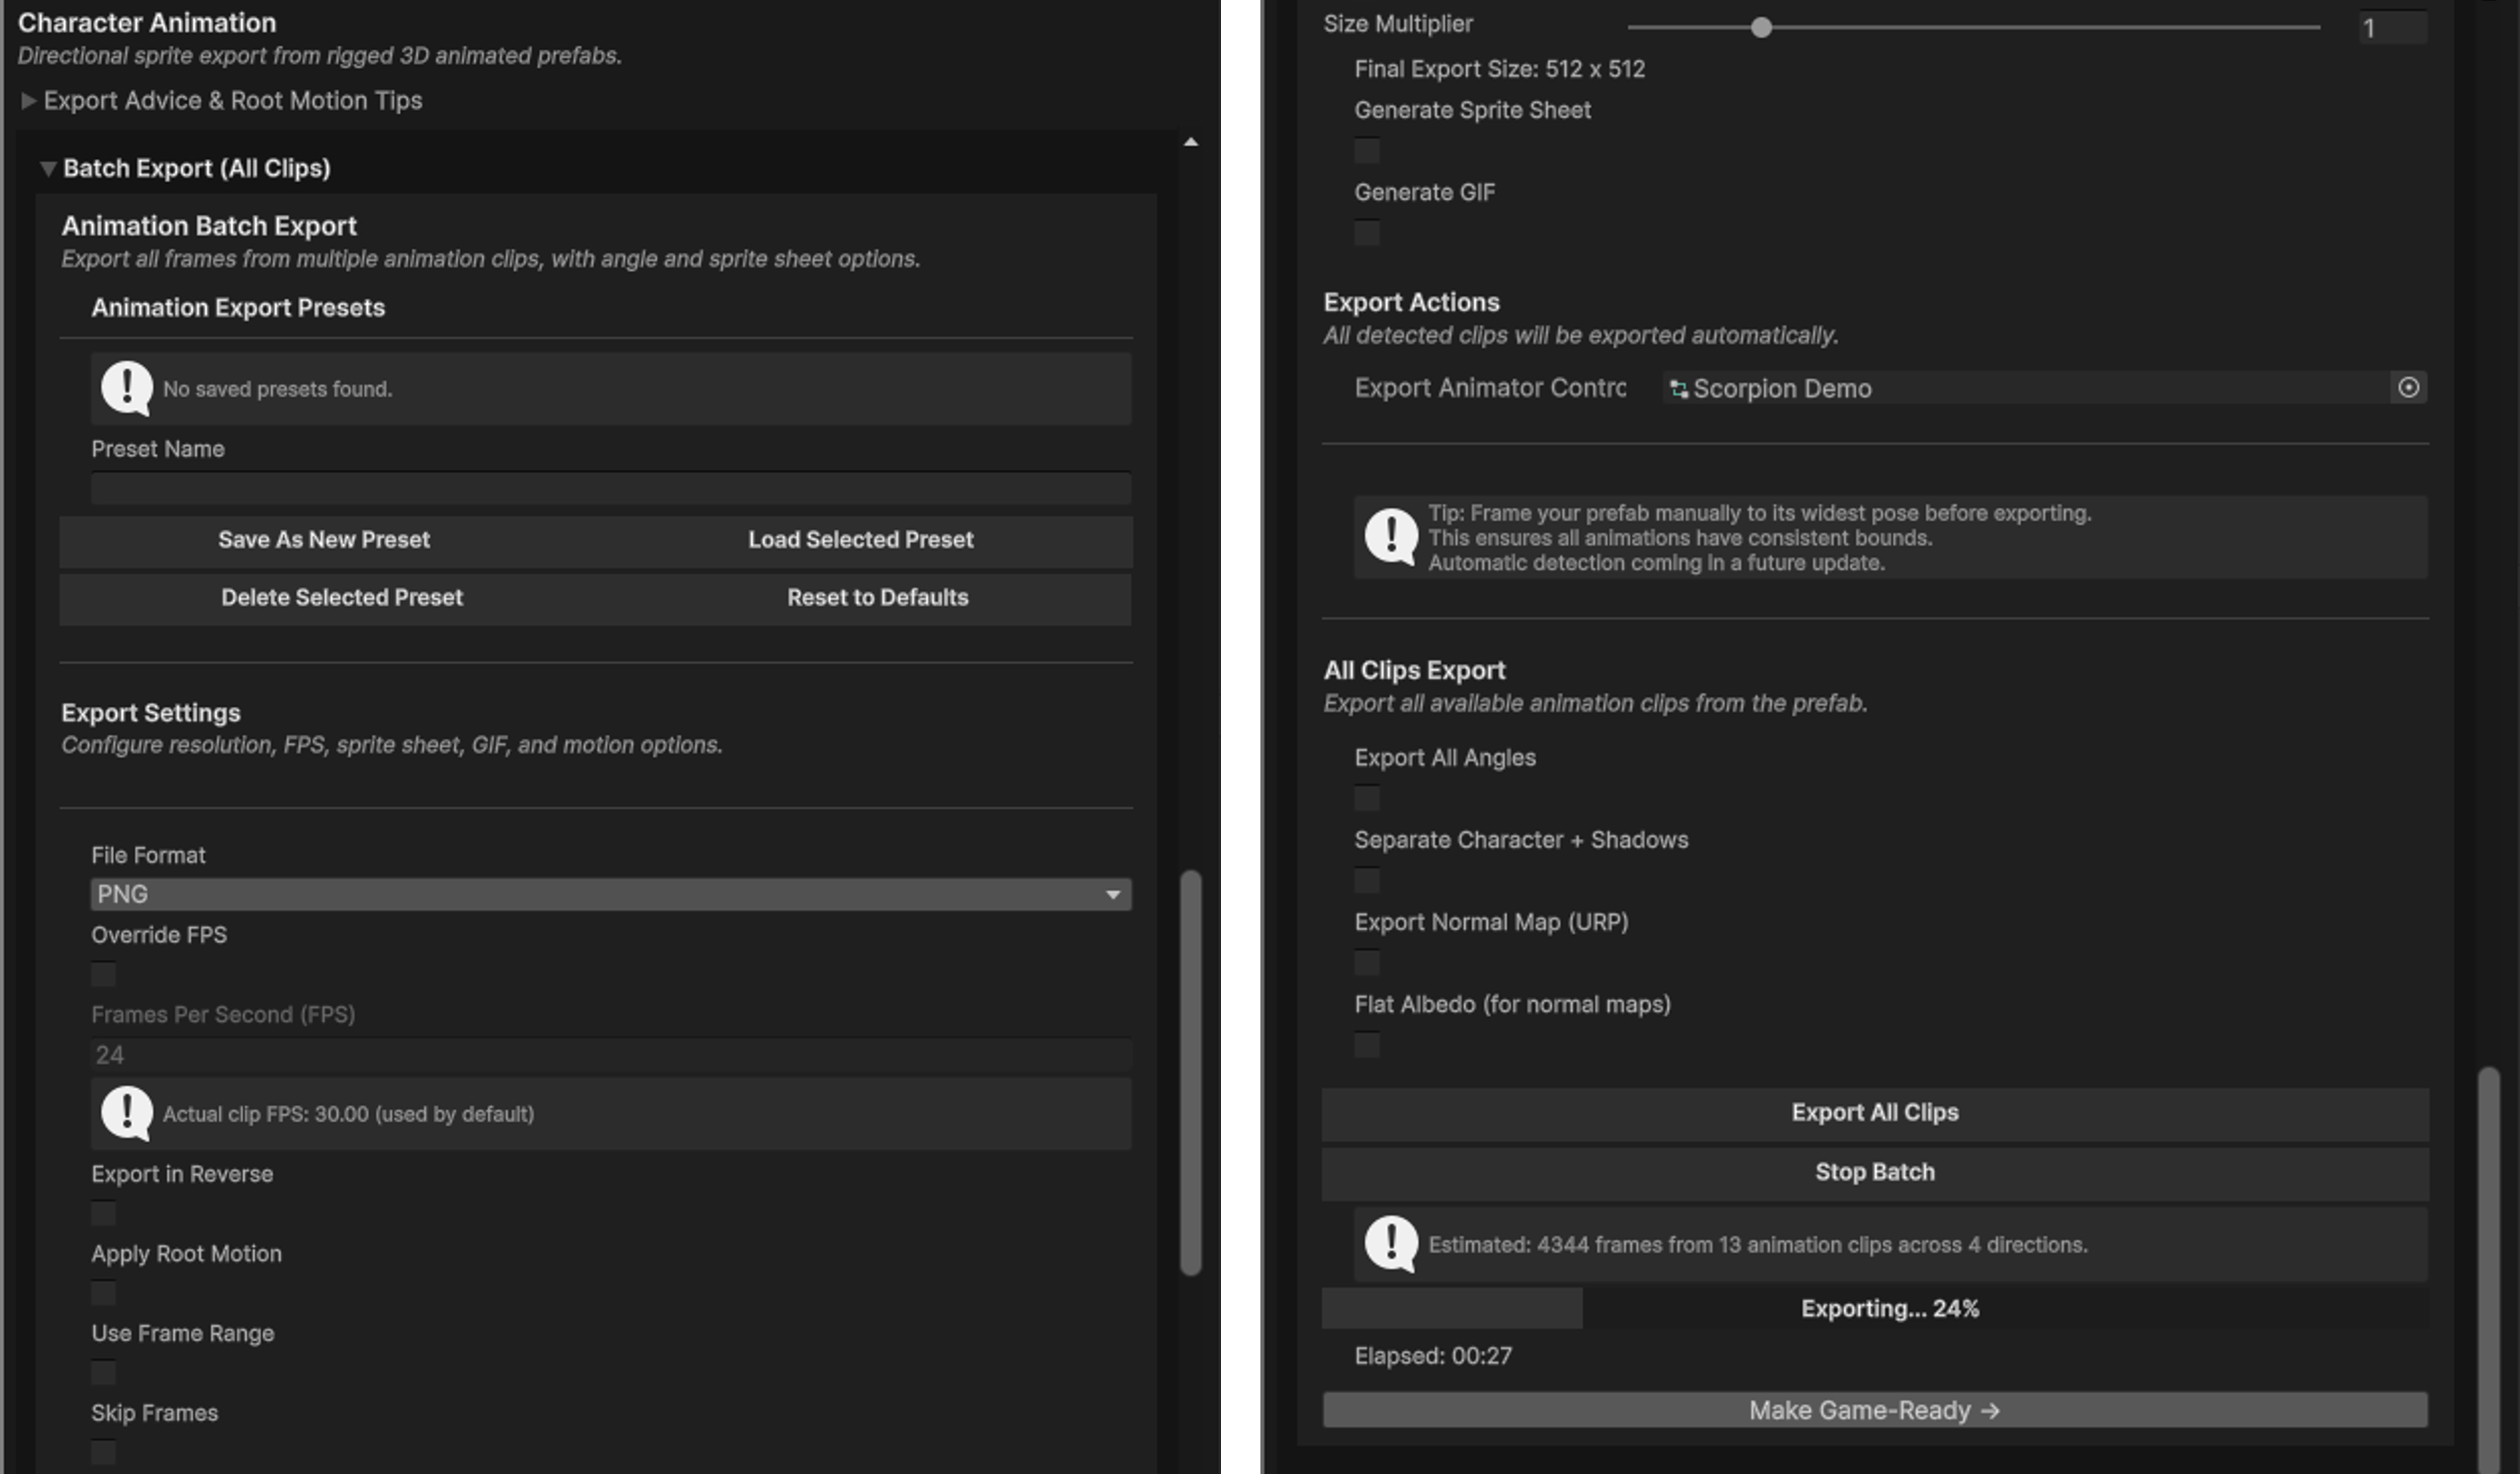
Frame sequence (the default). With Generate Sprite Sheet off, you get a folder of individual PNG frames — one file per captured pose. This is the shape Game-Ready Output reads to build engine-native clips, and the most flexible thing to hand to any other tool.
Sprite sheet. Tick Generate Sprite Sheet to also pack the frames into a single sheet texture after the run:
- Auto Layout arranges the frames automatically; turn it off to set Frames Per Row yourself.
- Sheet File Prefix (default
Sheet_) names the packed file.
Raw frames can be cleaned up after the sheet is built
Tick Skip Raw Frames and Snap deletes the individual PNGs once the sheet is assembled, leaving only the packed sheet. Leave it off if you want both the loose frames and the sheet — for example, frames for Game-Ready and a sheet for a quick preview.
Sprite slicing needs the 2D Sprite package
If Unity's 2D Sprite package isn't installed, sheets are still written as textures, but slicing and sprite import settings won't be applied. Snap warns you inline when the package is missing.
Animated GIF. GIF export lives on the Batch Export (All Clips) foldout — tick Generate GIF there. It's marked experimental in-tool: the result is a looping GIF for quick sharing or previews, not a perfectly optimised one.
Layerable shadows in one run
Tick Separate Character + Shadows and both Export Full Clip and Export All Angles write two sets in a single run — a Character folder (no shadow) and a Shadows folder (no character) — so you can layer or recolour the shadow independently. This needs a shadow setup with a transparent ground; see Backgrounds & Styling.
6. Batch every clip at once
If a prefab has several clips — idle, walk, run, attack — the Batch Export (All Clips) foldout exports all of them in one pass, sharing the same resolution, format, FPS, sprite-sheet, and angle settings. Extras here that the single-clip path doesn't expose:
- Override FPS — by default Snap exports exactly what's in each clip; enable this only to force a specific frame rate. The detected clip FPS is shown so you know what "default" means.
- Use Frame Range — limit export to a start/end time in seconds.
- Skip Frames — export every 2nd, 3rd, … frame to thin out a sequence.
- Export in Reverse — reverse playback during export.
An Estimated frames line tallies clips × directions so you know the size of the job before you start.
7. Combine with directional capture
Both Export All Angles (single clip) and Batch Export honour the preset in the Directional Capture Settings foldout at the top of this tab. Set it to a 4-, 8-, or 16-direction preset and Snap runs the animation once per facing, writing each facing into its own Angle_### subfolder. That's the same layout Directional Capture covers in full, and the same layout Game-Ready Output turns into a direction-switching AnimatorController.
Troubleshooting
The tab says the prefab has no animation components
The prefab has no Animator or Animation component, or no clips were found on the one it has. Assign an Animator Controller in the object field under Animation Controls, or check that the clips are referenced by the controller.
Frames are clipped or jitter in size between poses
Different poses have different bounds. Run Auto-Frame to Largest Pose (step 2) before exporting so the camera fits the biggest frame and every frame shares it.
The character drifts across the frames
Apply Root Motion is on and the clip travels. Turn it off to animate in place, or keep it on if you want the travel baked into the sequence.
No sprite sheet appeared
Check Generate Sprite Sheet is ticked. For Export All Angles, frames live under per-angle subfolders, so the sheet step is skipped there by design — use single-facing Export Full Clip if you want a packed sheet.
Next steps
- Want it engine-ready? Game-Ready Output trims your frame folder into a playable AnimationClip and a drop-in prefab — single-clip or direction-switching if the folder holds
Angle_###facings. - Making a directional character? Directional Capture covers the angle presets, the live preview, and the
Angle_###output in full. - Just need one pose? The single-frame path here, or Capturing a Single Sprite for the Basic-tab version.