Installation & Compatibility
Snap Studio Pro is a Unity Editor tool that turns 3D prefabs into clean 2D sprites and animations. It installs like any other asset, runs entirely inside the Editor, and ships nothing into your build. This page covers importing it, which Unity versions and render pipelines it supports, and how to open the window for the first time.
The short version
Import the package into a Unity 6+ project, then open Tools → Rev Gaming → Snap Studio Pro. There's nothing to configure first — the window is ready the moment it opens.
Requirements
- Unity 6 or newer. Snap Studio Pro is built for Unity 6+.
- Any render pipeline. Built-in, URP, and HDRP are all supported — Snap detects your active pipeline and routes capture through the matching implementation, so you don't pick one manually.
- Editor-first. Every capture Snap performs happens in the Editor, and the whole capture pipeline is compiled out of player builds. A few small assemblies are not — see What reaches your build below for exactly which, and how to remove the optional ones.
Unity 2023 and earlier are not officially supported
Snap Studio Pro targets Unity 6+. Earlier versions (2023 and older) are not officially supported and may not behave correctly. HDRP volume-override workflows in particular require Unity 6.
Example assets are not included
The characters, environments, props, and other assets shown in screenshots throughout this guide are not included with Snap Studio Pro — they're used purely for demonstration. Snap captures your prefabs; it doesn't ship art.
1. Import into your project
Import Snap Studio Pro into a Unity 6+ project the same way you'd import any asset — through the Package Manager or by dragging the package in. The files land under Assets/RevGaming/SnapStudioPro/.
Importing is safe in any project
Snap adds nothing to your scenes, changes no project settings on import, and starts nothing running. What it contributes to a player build is small, opt-out, and listed in What reaches your build below.
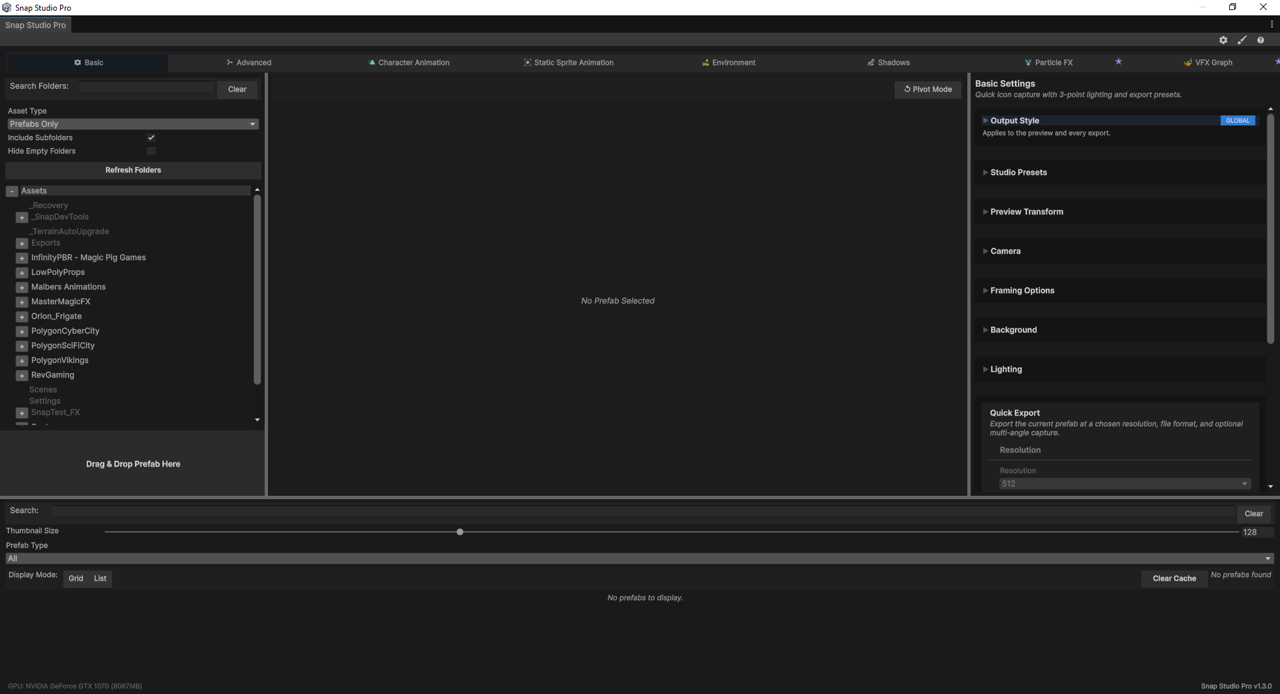
2. Render pipeline: nothing to set up
Snap works with the Built-in Render Pipeline, the Universal Render Pipeline (URP), and the High Definition Render Pipeline (HDRP). It auto-detects the pipeline your project is using and captures through the matching path — you don't select or switch anything.
Pipeline-specific behaviour
A few capture details differ by pipeline — most notably how transparency (alpha) is handled on URP. Snap warns you when a pipeline is about to affect a capture. For the full rundown, see Render Pipeline Notes.
3. Open the window
From the Unity menu bar:
Tools → Rev Gaming → Snap Studio Pro
That's the main entry point. The window opens on the Basic tab, ready to take a prefab.
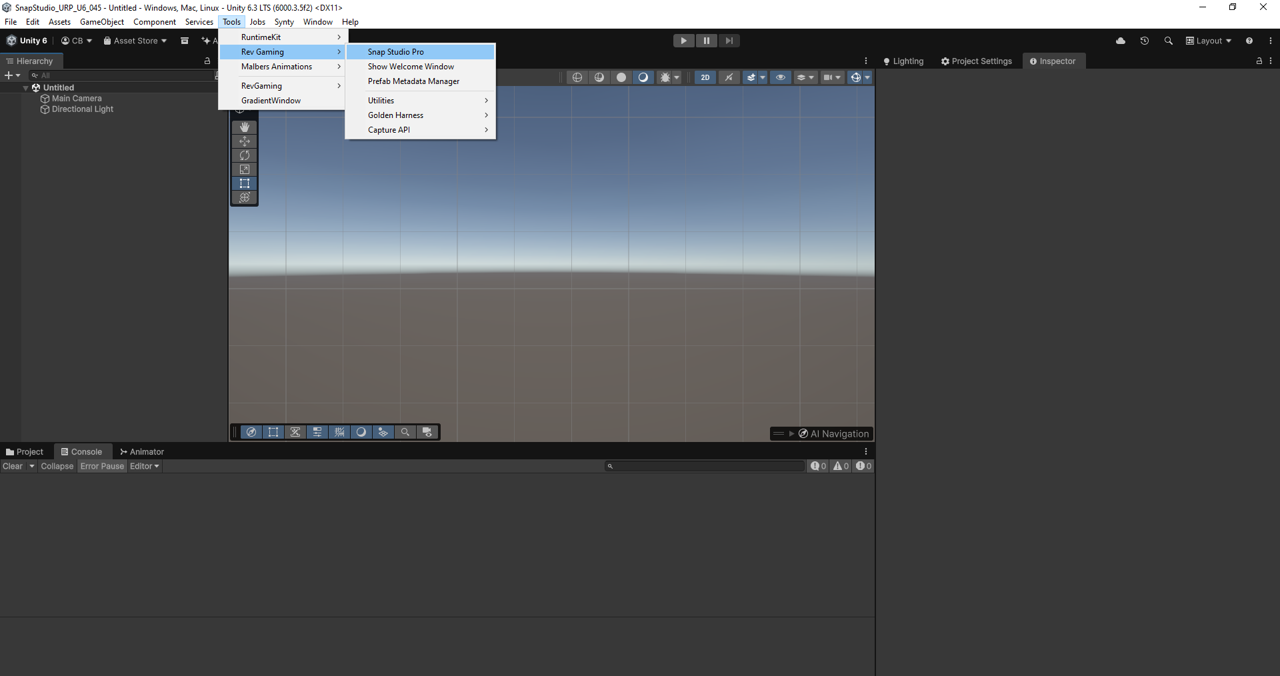
The same menu holds a few extras
Under Tools → Rev Gaming you'll also find a Welcome window, a Prefab Metadata Manager, and a Utilities submenu — a debugger, a thumbnail-cache clear, shader tools, an experimental Snap Labs sandbox, and a preferences reset. You never need any of these to capture a sprite; they're there when you want them.
4. Find the bundled documentation
A copy of the docs travels with the asset. Look under:
Assets/RevGaming/SnapStudioPro/Documentation/
That folder holds the README and setup guidance. Most major source folders also carry a README.md describing what that area owns, so the codebase is self-documenting if you go exploring.
What reaches your build
The capture pipeline is Editor-only. The window, the preview, framing, lighting, the camera systems and every exporter live in Editor assemblies, and none of it is compiled into a player.
Four assemblies are not Editor-gated, and it is worth naming them rather than claiming a zero footprint:
| Assembly | Size | Why it is not Editor-only |
|---|---|---|
PrefabMetadata | ~147 lines | The components that tag prefabs for filtering. They live on your prefabs, so they have to be runtime types. |
Attributes | ~23 lines | Attributes used by those components. |
RuntimeKit/Runtime | ~954 lines | Optional. Demo scripts driving the sample scenes — character controller, health, camera follow. |
ThirdParty/uGIF-master | ~1,221 lines | The bundled GIF encoder. |
Nothing in the capture pipeline runs at runtime. RuntimeKit does, if you choose to use its demo scripts — that is what it is for.
Removing what you don't need
Delete RuntimeKit/ and ThirdParty/ and nothing else stops working except GIF export and the demo scenes. That leaves about 170 lines — the prefab metadata components and their attributes — which you need only if you use metadata filtering.
This page used to say something different
Earlier revisions of this page were titled "Editor-only, zero runtime footprint" and stated that nothing from Snap Studio Pro ships in your build. That was wrong, and it was wrong when it was written — RuntimeKit has been in the package since 1.1.0.
The correction is stated here rather than quietly replacing the old text, because a claim about what lands in your build is exactly the kind you should be able to check us on.
Next steps
You're installed and the window opens — that's everything you need to make your first sprite.
- Ready to capture? Your First Sprite walks the whole load → frame → export loop in about a minute.
- Want the lay of the land first? Tour of the Window maps every tab so you know where each workflow lives.